Vortx recommends using a Gmail account as your email hosting provider. If you would like to sign up for Google Workspace (previously GSuite), you can do that here.
Once you have signed up for Gmail/Workspace and are logged into your account, head here. Go to the left menu and select Security:

Under the section "Signing in to Google", verify if your "2-Step Verification" is enabled (either ON or OFF).
If your 2-Step Verification is disabled (OFF), then you will need to enable it by clicking on the option, and walk through the Steps Google provides to get it ON.

Once your 2-Step Verification is enabled (ON) as shown above, then you will need to do these steps:
Go back to the Security page and scroll down to the "Signing in to Google" and click the "App passwords" option.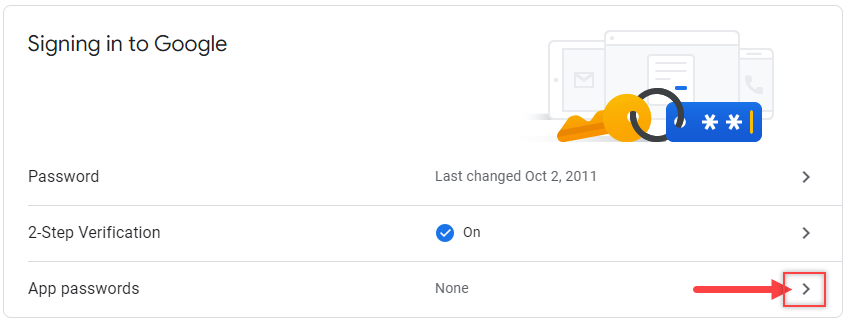
- Use "Other (Custom name)" for the "Select app" and enter what you like, such as "Website Setup E-Mail" (the "Select device" is not needed).


- You will then Generate a random password that you Copy/Paste into your password field of the site Configuration - Setup E-Mail field, "Mail Server Password". For direct Configuration - Settings entry, it is the setting: MailMe_Pwd which may be necessary to do if setting up a multi-store (MoreStore) storefront.
Once you have this account setting configured correctly, you're ready to complete the setup in your storefront.
Now you can log into your store admin console:
- Go to Configuration > Setup E-mail
- Fill out the top 5 fields on the page:
Mail Server DNS: smtp.gmail.com
Mail Server Username (optional): your email address
Mail Server Password (optional): App password
Mail Server TCP Port: 587
Mail Server Requires SSL: Yes - Now, you can fill out the rest of the page, but note that your "From" fields should only use emails registered to the authenticated (Mail Server Username) email account.
- Do not try to use multiple emails in the "to" field. If you need notifications to go to multiple people, you'll need to set rules in your "to" email account to forward specific emails to other people.
- Finally, hit the "Test All" button. You should get 4 green messages at the top of the page to confirm your store is connected to your Gmail account.
- NOTE that the Send Receipt will go to the currently logged in user email, the other tests go to the TO email set in the wizard fields.
 *click image to zoom. DO NOT EMAIL US AT THIS ADDRESS. This email address is for demonstration only.
 - Finally, go back to your Gmail account and you should see your test emails in your inbox. You may receive a notice that "someone attempted to sign in to your Gmail account" and you can open that and click the link to let them know "It was me".
You should be all set with your email setup at this point. Remember that if you change your email password, you will need to update your preFIX site to match.
Was this article helpful?
That’s Great!
Thank you for your feedback
Sorry! We couldn't be helpful
Thank you for your feedback
Feedback sent
We appreciate your effort and will try to fix the article