A carousel is a slideshow component for cycling through a series of elements such as images or slides of text.
Things to consider before using a carousel:
- Carousels are generally not compliant with accessibility standards.
- Conversion rates are often low and carousel interaction drops off heavily after the first slide.
- The loading of images and scripts for the carousel can cause a performance hit (page loading speed), especially for mobile users.
If you are using one of our responsive templates, the Bootstrap framework, which supports the use of a carousel is built into your template. If you are not using one of our templates, complete documentation on Bootstrap carousels can be found here.
In this article, we will show you how to add a carousel to the homepage of your site using our Yummy! template. We will include 3 image slides for the carousel as well as add the indicators and controls.
First, let’s look at the carousel code. This will be broken into 3 sections.
Code section 1 (Indicators):

The indicators are small dots that appears at the bottom of each image slide. These indicate how many slides are within the carousel and also which slide the user is currently viewing. The data-target value (highlighted above) needs to match the id with the slides (Code Section 2) and with the controllers (Code Section 3).
<ol class="carousel-indicators">
   <li data-target="#carousel-example-generic" data-slide-to="0" class="active">
   </li>
   <li data-target="#carousel-example-generic" data-slide-to="1">
   </li>
   <li data-target="#carousel-example-generic" data-slide-to="2">
   </li>
</ol>
The indicators are not required for a carousel to operate.
Code section 2 (Slides):
Slides are the large images that are the main content of your Carousel. They will replace the singular billboard image when you add a carousel.
<div class="carousel slide" id="carousel-example-generic" data-ride="carousel">
   <div class="carousel-inner" role="listbox">
      <div class="item active">
         <a href="#">
            <img class="img-responsive" alt="FirstSlide" src="/images/large1.jpg" />
         </a>
      </div>
      <div class="item">
         <a href="#">
            <img class="img-responsive" alt="SecondSlide" src="/images/large2.jpg" />
         </a>
      </div>
      <div class="item">
         <a href="#">
            <img class="img-responsive" alt="ThirdSlide" src="/images/large3.jpg" />
         </a>
      </div>
   </div>
</div>
The code above pulls in each image using an image tag and is listed in the order they should display. The src (highlighted in green) shows the image file path where the image is located within the site files. The anchor tag (highlighted in blue) is the url path to where the image links to. If you would prefer the image not include a link, just remove the anchor tag <a href=”#”> and </a> around the image tag.
Note: Each image slide should be the same dimensions for both height and width. If the images are different sizes, it can cause ‘jumping’ between the slide transitions.
Code Section 3 (Controls):
The controllers act as Previous and Next buttons on the carousel. This enables users to scroll through the image slides at their leisure.

The controllers are not required for a carousel to operate. You can see the code that the controllers need here:
<a href="#carousel-example-generic" class="left carousel-control" role="button" data-slide="prev">
   <span class="glyphicon glyphicon-chevron-left" aria-hidden="true"></span>
   <span class="sr-only">Previous</span>
</a>

<a href="#carousel-example-generic" class="right carousel-control" role="button" data-slide="next">
   <span class="glyphicon glyphicon-chevron-right" aria-hidden="true"></span>
   <span class="sr-only">Next</span>
</a>
Carousel Code with Indicators and Controllers:
Here is the full code you can use to replace your billboard image with a carousel:
<div class="carousel slide" id="carousel-example-generic" data-ride="carousel">

   <ol class="carousel-indicators">
      <li data-target="#carousel-example-generic" data-slide-to="0" class="active"></li>
      <li data-target="#carousel-example-generic" data-slide-to="1"></li>
      <li data-target="#carousel-example-generic" data-slide-to="2"></li>
   </ol>

   <div class="carousel-inner" role="listbox">
      <div class="item active">
         <a href="#">
            <img class="img-responsive" alt="FirstSlide" src="/images/large.jpg" />
         </a>
      </div>
      <div class="item">
         <a href="#">
            <img class="img-responsive" alt="SecondSlide" src="/images/large.jpg" />
         </a>
      </div>
      <div class="item">
         <a href="#">
            <img class="img-responsive" alt="ThirdSlide" src="/images/large.jpg" />
         </a>
      </div>
   </div>

   <a href="#carousel-example-generic" class="left carousel-control" role="button" data-slide="prev">
      <span class="glyphicon glyphicon-chevron-left" aria-hidden="true"></span>
      <span class="sr-only">Previous</span>
   </a>
   <a href="#carousel-example-generic" class="right carousel-control" role="button" data-slide="next">
      <span class="glyphicon glyphicon-chevron-right" aria-hidden="true"></span>
      <span class="sr-only">Next</span>
   </a>
</div>
Now that we have a little understanding of the different code sections that make up a carousel, it’s time to implement this on the homepage.
Prerequisite:
- Image preparation. Make sure each image slide is the same dimensions.
- Image path. Make sure the image slides have been uploaded to your site files and you have noted your image file path.
Recommendation: Try setting up a test topic so that you can test out the carousel and ensure your images display correctly before moving the carousel to your homepage. If you would prefer not to use a test topic, you can always use the Content Backup feature to restore the old topic contents.
Instructions for Implementation:
- Navigate to your Admin Console (typically under /admin or /aesys) and log in.
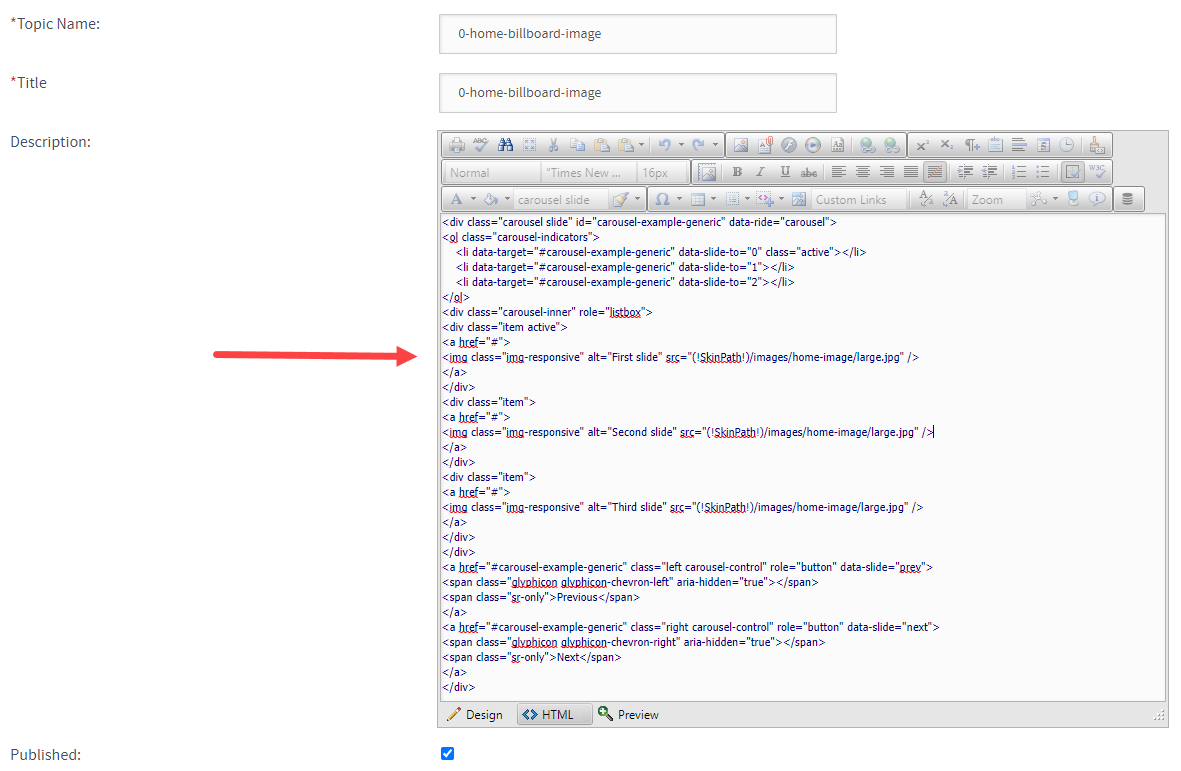
- Go to Content > Manage Topics and search for the topic name 0-home-billboard-image.
- Open the topic and select HTML view (HTML button located at the bottom of the test editor.
- Remove the the existing content in the body of the text editor and replace with the full or partial carousel code.

- Save your changes, select the Refresh Store button in the admin and do a refresh (CTRL + F5) on the front end of your website.
You should now see the carousel slide with the indicators and controllers on the site’s homepage.

Was this article helpful?
That’s Great!
Thank you for your feedback
Sorry! We couldn't be helpful
Thank you for your feedback
Feedback sent
We appreciate your effort and will try to fix the article